Display List of Released Purchase Requisitions
Use
This activity is performed to display the list of Released Purchase Requisitions.
Procedure
1. Access the transaction using the following navigation option:
SAP Graphical User Interface (SAP GUI)
| SAP menu |
Logistics → Materials Management → Purchasing → Purchase Requisition → List Display → General |
| Transaction code |
ME5A |
2. On the
List Display of Purchase Requisitions : Initial Screen, enter the necessary data:
| Field Name |
User action and values |
Remarks |
| Scope of List |
‘ALV’ |
Parameter that determines how the list is edited |
| Released Requisitions Only |
‘X’ – Check Box |
Specifies whether the list display is also to include already - released (approved) purchase requisitions. |
| Requisns for Overall Release |
‘X’ – Check Box |
If you set this indicator, the system lists all purchase requisitions that have to be released (approved) in their entirety. |
3. Click
Execute 
button.
4. List of closed Purchase Requisitions will be displayed, choose the necessary Layout to view the desired details of PRs.
Create Request for Quotation
Use
Typical to purchasing, inquiries are sent to possible vendors, who submit an offer / quotation, which is then stored in the system.
Procedure
1. Access the transaction using the following navigation option:
SAP Graphical User Interface (SAP GUI)
| SAP menu |
Logistics → Materials Management → Purchasing → RFQ/Quotation → Request for Quotation → Create |
| Transaction code |
ME41 |
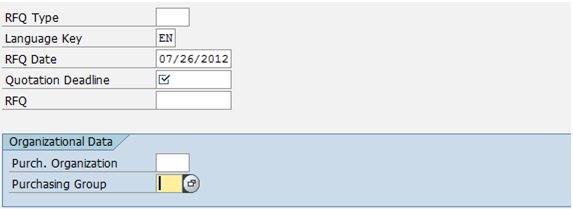
2. On the
Create RFQ : Initial Screen, enter the necessary data, and then click
Enter.
| Field Name |
User action and values |
Remarks |
| RFQ Type |
|
Identifier allowing differentiation between the various kinds of request for quotation (RFQ) in the SAP system. |
| Language Key |
EN |
The language key designates the language in which you use |
| RFQ Date |
Date today |
Date the request for quotation (RFQ) was created. |
| Quotation Deadline |
Date of deadline |
Date by which the vendor is to submit the quotation. |
| Organizational Data |
|
|
| Purch. Organization |
|
Denotes thepurchasing organization. |
| Purchasing Group |
|
Key for a buyer or a group of buyers, who is/are responsible for certain purchasing activities. |
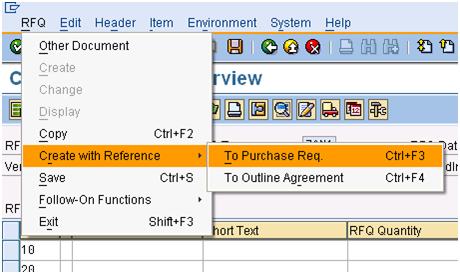
3. On the
Create RFQ: Item Overview screen, go to
RFQ → Create with Reference → To Purchase Req. or using the shortcut
Ctrl + F3.
4. Key in the Purchase Requisition Number.
5. Details will appear based on the referenced Purchase Requisition. Click the leftmost button of the line item to highlight all the details and click the
Adopt + Details 
button.
6. Click the
Header details 
icon.
7. Enter Collective Number (for easier to Monitor), then Click the
Vendor Address 
icon

To administer several requests for quotations, a tracking number can be assigned to each request. This makes it possible to list and monitor the requests for quotations. Furthermore, the quotations can be compared and further processed according to the tracking number. The following steps create the tracking number.
| Field Name |
User action and values |
Remarks |
| Administrative Fields Section |
|
|
| Coll. no. |
|
Enter a special tracking number |

In the next step, you enter the vendors from whom you would like to receive a quotation.
8. Enter Vendor code (choose from the drop down list) on the vendor field. Press
Enter. The details regarding the Vendor will be adapted. Click the
Save 
button. The system will generate an
RQF reference number. Below will appear
RFQ - X created under the number XXXXXXXXXX.
9. To add another Vendor, Repeat Step 8.
10. If done click the Exit or Shift + F3.
Maintain Quotation
Use
In this section the quotations from the vendors are entered into the system. These quotations reference the request for quotations created in the previous section.
Procedure
1. Access the transaction using one of the following navigation options:
| SAP menu |
Logistics → Materials Management → Purchasing → RFQ/Quotation → Quotation → Maintain |
| Transaction code |
ME47 |
2. On the
Maintain Quotation: Initial screen, input the following entry then press
Enter.
| Field Name |
User action and values |
Remarks |
| RFQ |
Enter your RFQ number |
Choose from dropdown list |
3. On the
Maintain Quotation: Item Overview screen. Click the leftmost button to select the material or line item to be maintained. Click the
Item details 
icon. Enter the following fields:
| Field Name |
User action and values |
Remarks |
| Quotation Data Section |
|
|
| Net Price |
|
Enter the Price given by the suppliers |
| Tax Code |
|
Optional |
4. Choose
Save 
icon. Below a message will appear - ‘
Quotation for RFQ - XXX XXXXXXXXX Maintained’.
5. Maintain the next Quotation by using the same procedure with the previous transaction.
Price Comparison
Use
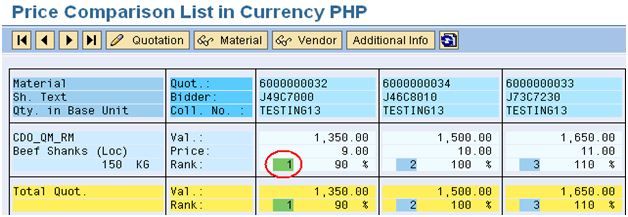
You can compare the prices among the quotations received as a result of a competitive bidding process using the price comparison list. The comparison list ranks the quotations by item from lowest to highest price.
Procedure
1. Access the transaction using one of the following navigation options:
| SAP menu |
Logistics → Materials Management → Purchasing → RFQ / Quotation → Quotation → Price Comparison |
| Transaction code |
ME49 |
2. On the
Price Comparison List screen, enter the following fields and press the
Execute 
icon.
| Field Name |
User action and values |
Remarks |
| Purchase Organization |
Required |
Denotes the purchasing organization |
| Quotation |
Optional |
Alphanumeric key uniquely identifying the document. |
| Collective RFQ |
Enter the Collective Number |
Number or code facilitating the collective management of a number of individual RFQs (or inquiries) or purchase orders. |
| Vendor |
Optional |
Alphanumeric key uniquely identifying the vendor. |
| Material |
Optional |
Alphanumeric key uniquely identifying the material. |
3. At the Price Comparison List in Currency PHP, a rank will be noted on which one have the lowest to highest quoted price.
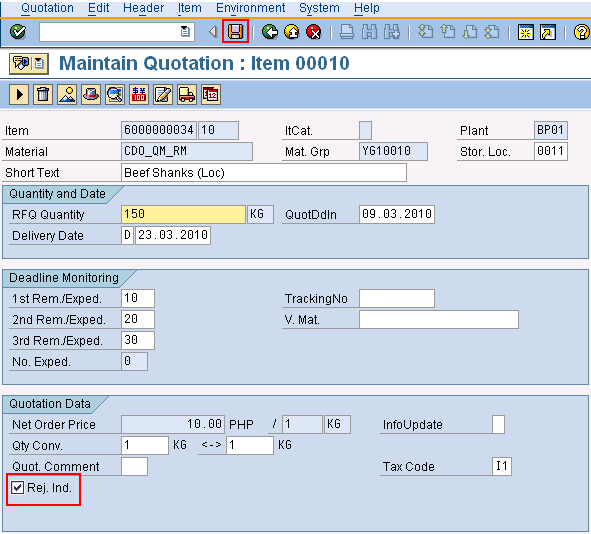
4. If an item has been chosen, double click the rejected quoted item then put a tick mark on it as shown below. Press the
Save icon. Repeat this step for all of the rejected quoted items. Note the RFQ numbers that have been approved to be used on creating Contract.
Result
You can compare the material prices quoted by different vendors. This comparison enables you to purchase materials from the vendor offering the lowest prices.
Create Purchase Order
Use
A purchase order is the request or instruction from a purchasing organization to a vendor (external supplier) or a plant to deliver a certain quantity of material or to perform services at a certain date.
Procedure
1. Access the transaction using the following navigation option:
SAP Graphical User Interface (SAP GUI)
| SAP menu |
Logistics → Materials Management → Purchasing → Purchase Order → Create → Vendor / Supplying Plant Known |
| Transaction code |
ME21N |
2. Choose the appropriate
Order Type.
3. Click the
Document Overview On 
button.
4. Choose the
Selection Variant 
button to display purchasing documents created.

A purchase order may be in reference to a
purchase requisition, a
request for quotation, a
contract, or based on another
purchase order. It can also be created without any reference to another purchasing document. Details of the reference will be copied to the new purchase order being created.
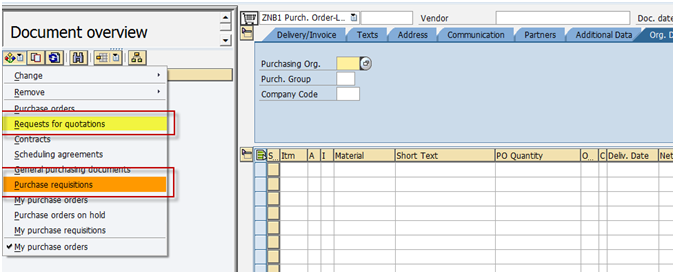
5. Choose reference as
Purchase Requisitions (or any other purchasing document).

If the Purchase Requisition was referenced to a
Request for Quotation (RFQ) document, choose
Request for quotations from the options instead of Purchase Requisitions.
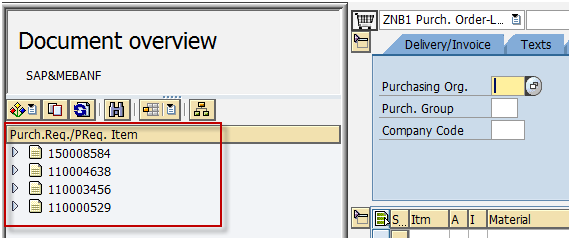
6. A parameter selection screen is displayed to search for the purchasing document.
7. A list of all the purchasing documents whether Purchase Requisitions or Request for Quotations depending on the selected criteria, will be displayed in the
Create Purchase Order screen.
8. Drag and drop the purchase requisition or any purchasing document selected to the
Shopping Cart 
icon.
9. The details of the document are copied to the purchase order being created.
10. In the Header Portion of the screen, select
Org. Data tab and make the following entries :
| Field Name |
User action and values |
Remarks |
| Vendor |
Choose from the list |
Number and name of the vendor (external supplier) or supplying plant from which the materials are to be procured. |
| Purchasing Org. |
Choose from the list |
Denotes the purchasing organization |
| Purch. Group |
Choose from the list |
Key for a buyer or a group of buyers, who is/are responsible for certain purchasing activities. |
| Company Code |
BP01 |
The company code is an organizational unit within financial accounting. |
11. In the
Item Overview, make the following entries :
| Field Name |
User action and values |
Remarks |
| A |
Choose from the list -
Blank for stock items
A – Asset
K – Cost Center |
Account Assignment – Specifies whether accounting for an item is to be effected via an auxiliary account. |
| I |
Choose from the list -
Blank for standard
K – Consignment
L – Subcontracting
D - Service |
Item Category – Key defining
how the procurement of a
material or service item is
controlled. |
| Material |
Choose from the list |
Enter a material number if you
want to order a material with a
material master record. |
| PO Quantity |
|
Quantity ordered by the buyer, to
be supplied by the vendor. |
| Plnt |
Choose from the list |
Plant in which you produce or for
which you wish to procure
materials or services. |
12. In the
Item Detail, select the
Conditions tab and make the following entries :
| Field Name |
User action and values |
Remarks |
| Amount |
|
Determines how the system calculates pricing using this condition |
13. In the
Item Detail, select the
Invoice tab and enter
Tax Code:
14. If the Item being used is a
generic material, an error with message
“Please enter an MPN material” will appear. Select the
Material Data tab and at the
Search Help of
MPN material field, enter and choose the appropriate brand for the item.
15. In the
Item Detail screen, select the
Text tab and enter text entries:
16. In the
Item Detail screen, select the
Confirmations tab and choose
Inbound Delivery as
Confirmation Control:
17. Click
Check 
icon or
Ctrl + Shift + F3.
18. A dialog box appears containing system messages. Confirm warning messages. An error message will prevent you from saving the document.
19. Confirm messages by pressing Enter.
20. Click
Save 
.
Result
Purchase Order Created. A message “Purchase Order - XXX created under the number 47XXXXXXXX” is displayed in the status bar.


After a succesful creation, the P.O. Number will then be manually recorded by the Buyer onto his / her plotting sheet to keep track and monitor the status of the P.O. particularly if it is not yet printed or already printed.

To change / edit / block / delete the Purchase Order, go to transaction
ME22N.

To display the purchase order, go to transaction
ME23N.
Release Purchase Order
Procedure
1. Access the transaction using the following navigation option:
SAP Graphical User Interface (SAP GUI)
| SAP menu |
Logistics → Materials Management → Purchasing → Purchase Order → Release → Individual Release |
| Transaction code |
ME29N |
2. In the
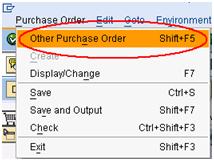
Release Purchase Ord. - Local XXXXXXXXX: Initial Screen, Go to
Purchase Order > Other Purchase Order or click the

icon to select a document other than the last displayed by the system.
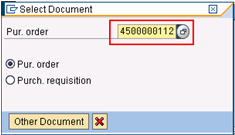
3. A
Select Document dialog box will appears. Enter the Purchase order number and press
Enter.
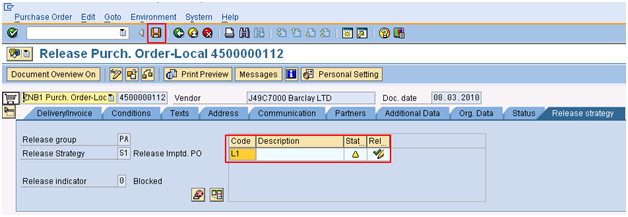
4. In the Header portion of the screen, select the Release Strategy tab.
5. Press the
Release 
icon to release / approve the Purchase Order.
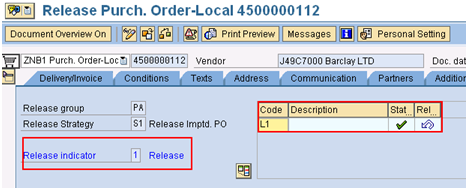
6. When the Release button is pressed, the Release indicator will then change from 0 to 1 for release.
7. Click
Save 
icon to save the changes in the document.

To cancel the release, go to the
Release Strategy tab and press the
Release 
icon to unreleased the Purchase Order. Click
Save 
icon to save the changes in the document.
Result
The Purchase Order is now approved. A message
“Release effected with release code XX” is displayed in the status bar. Please refer to
Appendix B for the PO Release Strategy matrix.

Print Purchase Order
Procedure
1. Access the transaction using the following navigation option:
SAP Graphical User Interface (SAP GUI)
| SAP menu |
Logistics → Materials Management → Purchasing → Purchase Order → Messages → Print/Transmit |
| Transaction code |
ME9F |
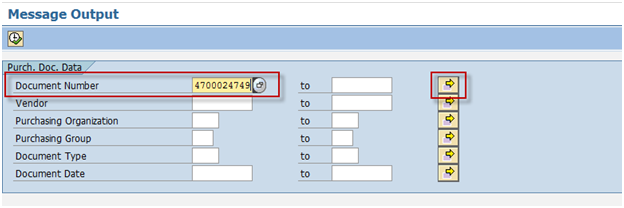
2. In the
Message Output screen, enter the
purchase order number to be printed in the
Document Number field, and / or enter selection parameters.
3. Click the
Execute 
icon.
4. In the succeeding screen, select the purchasing document to be printed. Choose

to process the document.
5. Choose

to preview the document.
6. A print preview will be displayed.
7. Choose

icon or function
F3 to go back to the
Message Output screen.
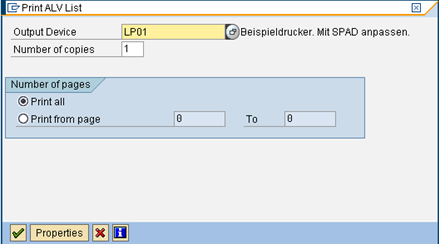
9. A print ALV List dialog box is displayed. Make the following entries:
| Field Name |
User action and values |
Comment |
| Output device |
|
Printer name |
| Number of copies |
|
|
10. Choose

icon.
Result
The Purchase Order document is printed.
Appendix
Purchase Order Process Flow Chart
 Business Process ProceduresPreview in PDF

 button.
 button.

 icon.
icon.  icon
icon  To administer several requests for quotations, a tracking number can be assigned to each request. This makes it possible to list and monitor the requests for quotations. Furthermore, the quotations can be compared and further processed according to the tracking number. The following steps create the tracking number.
 In the next step, you enter the vendors from whom you would like to receive a quotation.
 button. The system will generate an RQF reference number. Below will appear RFQ - X created under the number XXXXXXXXXX.
 icon. Enter the following fields:


 button.
  button to display purchasing documents created.
 icon.
icon. 


 icon or Ctrl + Shift + F3.
 icon to select a document other than the last displayed by the system.
 icon to release / approve the Purchase Order.
 icon to unreleased the Purchase Order. Click Save

 to process the document.
 to preview the document.
 icon or function F3 to go back to the Message Output screen.
 icon.
icon.