Goods Receipt against an Inbound Delivery
Use
This activity is performed to GR against an Inbound Delivery number and to post the stock with returnable packaging container / material in the inventory.
Procedure
1. Access the transaction using any of the following navigation options:
| SAP menu |
Logistics → Materials Management → Inventory Management → Goods Movement → MIGO |
| Transaction code |
MIGO |
2. In the
MIGO screen, choose
A01 - Goods Receipt with reference to
R04 - Inbound Delivery.
3. Input the Inbound Delivery Number or press F4 to begin a search.
4. Make sure that the
movement type at the right most part of the screen is
GR Goods Receipt 101. Otherwise, type
101 in the box.
5. Press Enter. The details of the Inbound Delivery will be copied into the MIGO screen.
6. In the
Header Data Area, choose
General tab and make the following entries as applicable:
| Field Name |
User action and values |
Comment |
 |
3 Collective Slip |
Print Active/Inactive |
| Delivery Note |
|
Number of external Delivery Note |
| Header Text |
|
Explanation or notes which apply to the document as a whole |
7. To include the
Returnable Transport Material in the list, click the
Transport Equipment 
button. The system will create a new line item automatically on the MIGO Screen.
8. In the
Detail Data Area, choose
Material tab and enter the item code of the
Returnable Transport Material on the field provided.
9. In the
Detail Data Area, choose
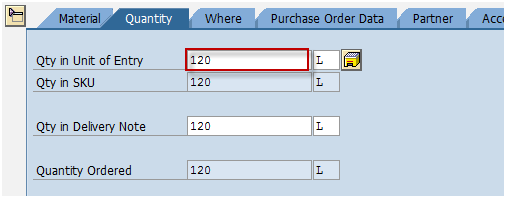
Quantity tab and make the following entries as applicable:
| Field Name |
User action and values |
Comment |
| Qty in Unit of Entry |
Numeric value |
Enter the quantity of the RTP material to be received. |
10. In the
Detail Data Area, choose
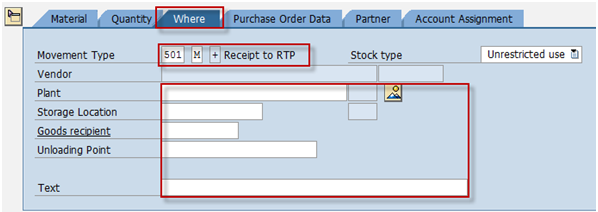
Where tab and make the following entries as applicable:
| Field Name |
User action and values |
Comment |
| Movement Type |
501 M |
Movement Type for Receipt to RTP |
| Plant |
BP02, BP03 |
Plant code |
| Storage Location |
Choose from the dropdown list |
Location on where you wish to store the material being received |
| Goods Recipient |
Text value |
Input additional name if necessary |
| Text |
Text value |
Input additional text if necessary |
11. In the
Detail Data Area, choose
Partner tab and make the following entries as applicable:
| Field Name |
User action and values |
Comment |
| Vendor |
|
Specify the name of the vendor / supplier |
12. Tick the
Item OK check box.
13. Set / input and tick the line item number to GR the principal item.
14. In the
Detail Data Area, choose
Quantity tab and make the following entries as applicable:
| Field Name |
User action and values |
Comment |
| Qty in Unit of Entry |
Numeric value |
Change the default quantity if partial delivery. |
15. In the
Detail Data Area, choose
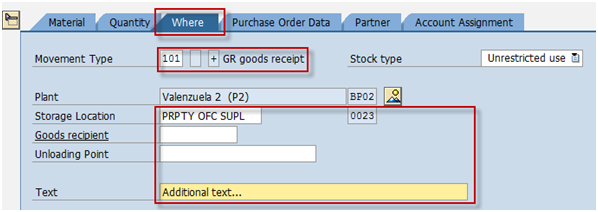
Where tab and make the following entries as applicable:
| Field Name |
User action and values |
Comment |
| Storage Location |
Choose from the dropdown list |
Location on where you wish to store the material being received |
| Goods Recipient |
Text value |
Input additional name if necessary |
| Text |
Text value |
Input additional text if necessary |
16. In the
Detail Data Area, choose
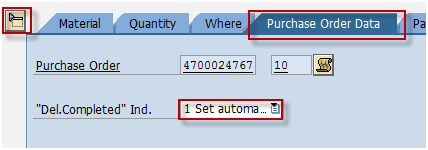
Purchase Order Data tab and make the following entries as applicable:
| Field Name |
User action and values |
Comment |
| Del. Completed Ind. |
List Box |
Choose 2 – Set
If there is no more expected delivery for this purchase order, that is, the PO is already closed. |
17. Click the
Check 
button.
18. A dialog box will appear containing system messages. Confirm all warning messages. Note that an Error Message will prevent you from posting the document.
19. Confirm messages by pressing Enter.
20. Click
Save 
icon or
Post 
button to post the document.
Result
1. A material document is created.
2. Stock of the
RTP material on the inventory will increase. You can monitor the inventory of the Returnable Transport Packaging through transaction code
MMBE or MB51.
3. The purchase order history tab of the PO is updated.
a. Access the transaction using any of the following navigation options:
| SAP menu |
Logistics → Materials Management → Purchasing → Purchase Order → Display |
| Transaction code |
ME23N |
b. In the
Standard PO screen, choose

icon.
c. In the
Select Document dialog box, enter the PO number,
d. Press
Enter.
e. The Purchase Order is displayed. Notice a new tab added to the Purchase Order:
Purchase Order History. The tab is updated by the goods receipt done.
 Business Process ProceduresPreview in PDF


 button. The system will create a new line item automatically on the MIGO Screen.


 button.
 icon or Post
  button to post the document.
 icon.
icon.