Released Purchase Orders Monitoring Facility
Use
This facility is used to monitor and to track the status of all released purchase orders created for a certain period and to eliminate manual creation of reports regarding purchase orders.
Procedure
1. Access the transaction using following navigation options:
2. On the
Purchase Order Transactions Monitoring : Selection Options, make the following entries as necessary / applicable:
| Field Name |
User action and values |
Comment |
| Purch. Doc. Date |
Required |
Date on which the PO was created |
| Purch. Group |
Optional. |
Code of person or group who created the purchasing document |
| Plant |
Optional |
Plant on which the document is intended to receive |
| Purch. Document |
Optional |
Purchase order number you wish to display |
| G.R. Number |
Optional |
Goods receipt number associated in the purchasing document |
| G.R. Date |
Optional |
Document date on which the goods or services is received |
| Supplier |
Optional |
Code of the supplier/vendor |
| Item Code |
Optional |
Material associated under the purchasing document |
| Material Group |
Optional |
Key use to group the materials or services with the same attributes |
3. On the
Purchase Order Transactions Monitoring: Document Type Selections tab, select at least one in any of the following format you want to display.
| Field Name |
Comment |
| Purch. Order – Local |
Standard Purchase Orders Local Only (ZNB1) |
| Purch. Order – Imported |
Standard Purchase Orders Imported Only (ZNB2) |

You can select either document type or a certain single type to be displayed.

If none of these options has selected, an error message will be displayed informing you need to select at least one document type.
4. Click the
Execute 
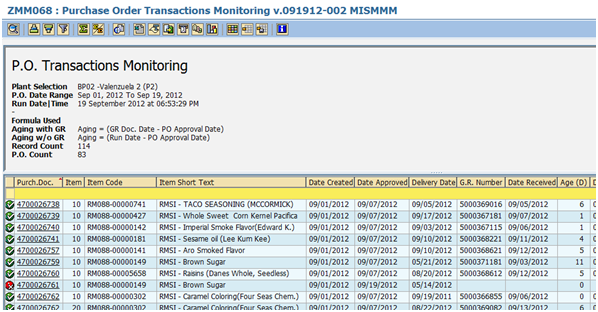
icon. The program will display the list based on your selections.
5. The icon

means that the PO Number next to it has not yet been delivered (No GR yet).
6. The icon

means that the PO Number next to it has already been delivered regardless if it is staggered delivery of not (GR already exist).
7. To view the details of the purchase order, simply click the PO Number and the program will redirect you to
ME23N – Display Purchase Ordertransaction.
8. The
Age field indicates the
age in days of the document since the PO was approved until the
first delivery of the document has been received. If the document
does not have a GR number yet, age will be computed
from the date it was approved up to the current system date. The formula of the age is displayed on the top of the screen.
9. To export the list as a local file (MS Excel Format), click the
Local file 
icon on top the screen or press
Ctrl + Shift + F9.
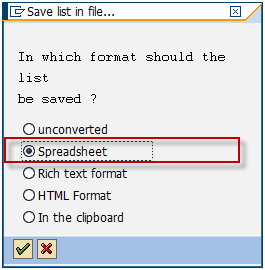
10. A popup dialog box will appear. Choose
Spreadsheet option.
11. The system will then ask you the directory and filename of the file. Specify the location on which you wish to save the excel file and give a descriptive filename. Click
Generate button.
12. The list has been exported to specified destination.
13. Click
Back 
button to go back to the initial screen to select other formats.
 Business Process ProceduresPreview in PDF
 You can select either document type or a certain single type to be displayed.
 If none of these options has selected, an error message will be displayed informing you need to select at least one document type.
 icon. The program will display the list based on your selections.

 means that the PO Number next to it has not yet been delivered (No GR yet).

 means that the PO Number next to it has already been delivered regardless if it is staggered delivery of not (GR already exist).


 icon on top the screen or press Ctrl + Shift + F9.


 button to go back to the initial screen to select other formats.